Hey motorcycle enthusiasts! Did you know? Of all motorcycle gear, the helmet is undoubtedly the most crucial piece.
It’s not just a fashion statement, but also your last line of defense for your life.
An ill-fitting helmet can, at best, make riding uncomfortable, and at worst, fail to provide sufficient protection in critical moments.
So, to get a truly “life-saving” helmet, the first step is to know exactly how big your head is!
Don’t worry, measuring head size isn’t like solving a complex physics problem.
All you need is a flexible measuring tape, a mirror (it’s best to ask a friend for help!), and this super detailed, easy-to-understand, step-by-step guide we’ve prepared for you!
Part 1: Preparation – What You Need Before you begin measuring,
make sure you have the following “tools” ready:
1. A flexible measuring tape (cloth tape measure/tailor’s ruler):
This is the ideal tool. Its flexibility perfectly conforms to the curves of your head. Avoid using: Stiff measuring tapes or rulers, as they cannot accurately measure round objects.
2. A mirror: Used to confirm that the measuring tape is positioned correctly.
3. A helper (optional, but highly recommended):
A friend or family member can help you locate and read the data more accurately, greatly improving accuracy.
4. Paper and pen: Record your measurements.
Part Two:Precise Measurement
– Key “Head Circumference” Data Helmet size is based on your maximum head circumference, commonly known as “head circumference.”
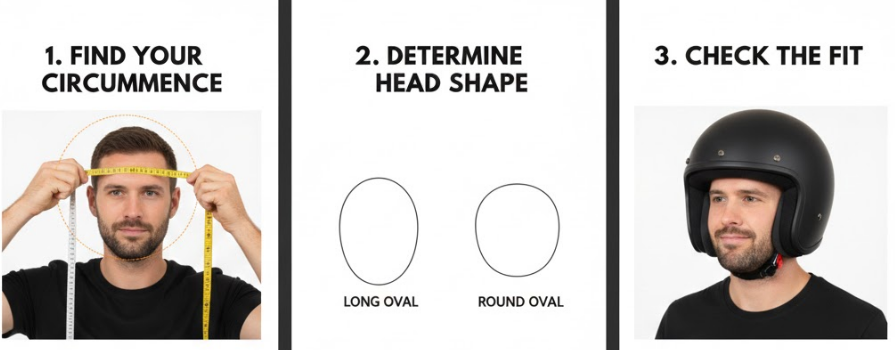
Step One: Finding Your “Golden Measurement Line” Correct measurement positions are key to ensuring a perfect helmet fit:
Above the forehead: Place the starting point of the measuring tape in the middle of your forehead, approximately 1 to 2 centimeters (or about one inch) above your eyebrows.
This position is usually the widest or most prominent part of your forehead. Above the ears: Make sure the measuring tape passes over your ears, without pressing on them.
Back of the head: The measuring tape should go around the most prominent part of the back of your head.
Everyone has a small bulge at the back of their head; make sure the measuring tape passes through it to find the widest part of your head.
Step Two: Wrap and Read the Data Wrap the measuring tape around your head:
Keeping the tape measure flat, wrap it around your head until the start and end points meet again on your forehead.
Tightness: The tape measure should be of moderate tightness. It needs to fit snugly against your skin, but not too tight, nor too loose to slide on your scalp.
Imagine how you’d want a helmet to fit you—close but comfortable.
Read the Value: Read the value where the tape measures the overlap.
Always use centimeters (cm)! Almost all helmet manufacturers use centimeters to mark sizes.
This is more accurate and more internationally recognized than inches.
Step Three: Repeat the Measurement to Ensure Accuracy Measure 3 times:
To prevent inaccuracies from the first measurement, repeat the above steps at least three times.
Take the Largest Value: Record the results of the three measurements and use the largest number as your final head circumference.
For example: If you measured 57.2 cm, 57.5 cm, and 57.4 cm, then your final size is 57.5 cm.
Part 3: More Than Just Head Circumference
– Understanding Your Head Shape While head circumference (circumference) is the basis for determining size, the fit of a helmet also depends on your head shape.
Different brands and models are designed for different head shapes.
Motorcycle helmet manufacturers typically categorize head shapes into three main types:
Head Shape Classification Characteristics Description Suitable for: Intermediate Oval Slightly longer in the front and back than on the sides.
The most common head shape; most helmets on the market fall into this category.
Long Oval Significantly longer in the front and back than on the sides; the head is relatively narrow.
Suitable for people with narrower heads and a longer length from the forehead to the back of the head.
Round Oval The length and width of the head are nearly equal, with a more rounded shape.
Suitable for people with rounder heads and wider sides. Why is head shape important?
If you have a long oval head shape but wear a round oval helmet,
even if the circumference is correct, you will feel: noticeable pressure points on your forehead and back of the head, which may cause headaches.
The sides will feel too loose. Therefore, once you’ve determined your head circumference (e.g., 58 cm),
when choosing a brand and model, you also need to understand which head shape the helmet is designed for.
Part Four: Referring to the Size Chart
– From Centimeters to Helmet Size After obtaining your precise head circumference (e.g., 58.5 cm), the next step is to convert it to the helmet manufacturer’s size chart (S, M, L, etc.).
Please note: Size standards may vary slightly between brands!
Below is a general adult helmet size chart, but be sure to refer to the specific size chart provided by your preferred brand/model before purchasing.
Head Circumference (CM) Approximate Size (Size) Notes 51 – 52 XXS Smaller Size 53 – 54 XS 55 – 56 S 57 – 58 M Common Medium Size 59 – 60 L 61 – 62 XL 63 – 64 XXL Larger Size
The Golden Rule of Size Selection: Better Smaller Than Larger If your head circumference falls between two sizes (e.g., 58.5 cm, M is 57-58 cm, L is 59-60 cm),
we strongly recommend that you try the smaller size (M) first.
This is because: Liner Break-in: All helmet liners compress and loosen over time, making the helmet slightly looser.
If you choose a “just right” or slightly larger size from the start, it will become too loose over time and will not provide optimal protection.
Safety First: A tight-fitting helmet can evenly distribute impact force in the event of a collision. A loose helmet may shift during an impact or fail to provide adequate cushioning.
Key Tip: Ideally, the helmet should feel “a little tight, but without any pain points” when you first put it on.
If you feel a specific pressure point, or if you feel a sharp pain in a certain area of your head, it usually means your head shape doesn’t fit, or you need a larger size.
Part Five: Trying On and Checking
– Final Confirmation After Measurement Measurement is just a starting point;
trying it on is the final decision! Once you receive the helmet, please conduct the following “final check”:
1. Fitting Check (Putting it on) Putting on the helmet: You may feel a little strain when putting it on, which is normal. Top Fit: Ensure the top of the helmet completely covers the top of your head. Vision: Your eyes should be centered in the visor opening.
2. Shake Test (The Shake Test) Pushing from front to back: Try pushing the helmet upwards from the front (chin area). The helmet should not move or only move slightly. Turning left and right: Try turning your head left and right. The helmet should turn with your head and not slide independently on your head. If you can easily shake your head but the helmet doesn’t move, it’s too big!
3. Cheek Pad Test: The cheek pads should fit firmly against your cheeks. Slight Squeezing: Your cheeks should feel slightly squeezed, forming a “goldfish mouth” expression, or even slightly pinching your teeth when you speak—this is normal tightness initially. Finger Test: You shouldn’t be able to easily insert one or two fingers between your cheek and the cheek pads.
4. The 10-Minute Challenge: Wear the helmet continuously for 10 to 15 minutes at home or in a store, fastening the chin strap. Find Pain Points: Focus on any persistent, intense pressure points, especially on your forehead, temples, or back of the head. Tightness is acceptable. Stinging or sharp pain is unacceptable, meaning the helmet shape or size is not right for you.
Summary and Action Guide: Action Steps, Key Points, Measurement Goals
1. Prepare Tools: Use a soft measuring tape, ensuring it has centimeter markings.
2. Determine the location: 1-2 cm above the eyebrows, above the ears, at the most prominent point on the back of the head. (Golden measurement line)
3. Read the data: The measuring tape should fit snugly but comfortably. Repeat the measurement 3 times and take the maximum value. (Precise head circumference (CM))
4. Refer to the official size chart for the brand/model. (Preliminary size (S/M/L))
5. Try it on to confirm: It should fit snugly enough to press against your cheeks, not move when shaken, and cause no severe pain after wearing it for 10 minutes. (Final fit) Remember, a well-fitting motorcycle helmet is fundamental to your safe riding, and it’s worth the time and patience to accurately measure and try it on.
Treat your helmet selection with the same seriousness as your life! Now you have mastered all the secrets to measuring your head size. It’s time to pick up your measuring tape and take the first step towards choosing the perfect helmet!
Leave a Reply